
Article
Cut Planning Workflow 2026: 6 Steps From Parts List to Shop PDF
Cutlistor Team9 min read
Introduction
Cut planning is everything between an approved design and the first saw cut: turning dimensions into a part list, grouping materials, running layouts, and giving the floor something they can actually build from. Shops without a repeatable process depend on one senior builder's memory. That works until that person is on another job, a dimension changes, or someone prints the wrong layout version.
This article walks through a cut planning workflow for cabinet shops, furniture makers, and fab shops that mix sheet and linear stock. Cutlistor fits in as the browser-based optimizer that exports cut plan PDFs. It is not a replacement for your ERP, accounting, or full BOM system.
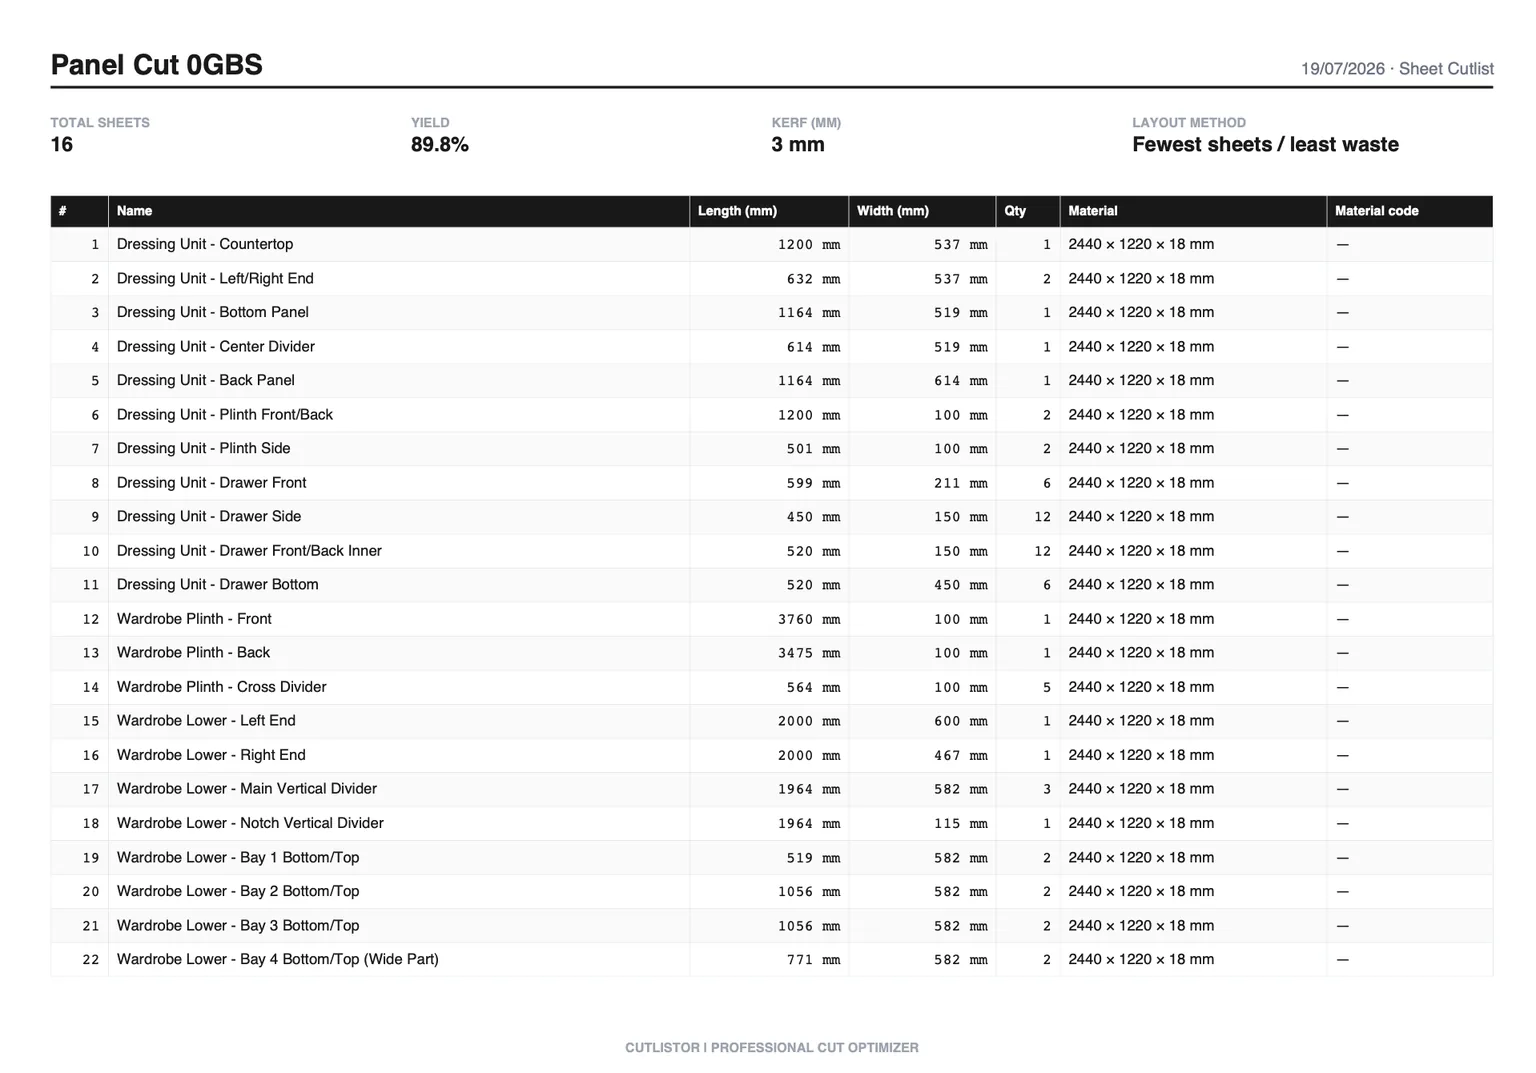
What is a cut plan PDF? It is the layout document Cutlistor exports after you enter stock, parts, and kerf. For sheet jobs it shows nested rectangles on each panel with part labels. For linear jobs it shows cut lengths sequenced on each stick. It is not a blank form template. It is a job-specific diagram your crew uses at the saw, panel saw, CNC, or chop station.
The workflow in seven steps
| Step | What you do | What you should have |
|---|---|---|
| 1. Lock dimensions | Confirm finished sizes against the drawing or CAD | A frozen part list: label, size, qty, material for every piece |
| 2. Group by stock | Split by thickness, sheet SKU, grain rules, and which machine cuts it | Separate batches (e.g. 18 mm melamine panels vs 6 mm backs vs 2×4 cleats) |
| 3. Enter stock and kerf | Use purchased sheet or stick sizes; set kerf for today's blade or bit | Stock rows that match what you will pull from inventory or the yard |
| 4. Run layouts | Sheet optimizer for panels; linear optimizer for sticks, trim, pipe, bar | Nested diagrams with sheet count or stick count and yield percentage |
| 5. Review before buying | Check yield, grain locks, and whether the layout matches how you actually cut | Approved sheet/stick counts for the quote and purchase order |
| 6. Export cut plan PDF or DXF | Export from Cutlistor; title PDFs by material (SHEET vs STICK) and job ID. CNC shops can export DXF for sheet and linear layouts when CAM needs geometry. | Printouts, tablet files, or DXF packs the floor or programmer can use at each station |
| 7. Cut and label | Mark parts to match labels on the PDF; shelve usable offcuts | Cut pieces ready for assembly, traceable to the same revision |
One-person shops often run steps 2 through 6 in a single sitting. Larger shops may have estimating build the list and a lead approve layouts before anything prints. The handoff document is always the same: a cut plan PDF tied to a revision, not a verbal go-ahead.
From BOM to cut list
Your BOM might live in ERP software, Excel, or a CAD bill of materials. The cut list is the manufacturing view: finished part sizes ready for the saw, not rough lumber before milling and not pricing lines with markup baked in.
Build the list once
Export or copy rows into a consistent column layout: label, width, height or length, quantity, material. Cutlistor imports CSV and XLSX directly into the optimizer. On paid plans, glTF, GLB, or Collada import pulls geometry from 3D CAD. AI plan scan (paid quotas) can seed parts from PDF elevations when you do not have CAD, but always verify dimensions against the contract set.
Check the list before nesting
- Spot-check the largest panels against the drawing
- Confirm quantities include pairs and mirrored variants
- Keep different thicknesses and finishes in separate material groups
- Include edge band or laminate allowance in finished sizes
Group by material and machine
Cut planning breaks down when unlike setups share one PDF. Group work by thickness, sheet SKU, grain rules, and which machine will cut it. A CNC nest for prefinished maple should not sit on the same printout as a table-saw breakdown for MDF shop cabinets unless your process truly combines them.
Sheet batches
Run the free sheet cut list optimizer once per material group. Enter actual sheet sizes, kerf, and grain when faces matter. Compare layout methods when yield is tight on a bid: pick the layout your operator or CNC post can execute without heroic skinny rips.
Linear batches
Run the free linear cut list optimizer for each stick family. List every stock length you will pull from the rack (8 ft, 10 ft, 12 ft, or metric equivalents). Use mitered ends when casing or trim requires it. Export a separate cut plan PDF for the chop saw bay.
The optimization pass
Optimization is where cut planning pays off. You are proving sheet count before purchase, not discovering you are one short mid-build.
Set kerf and grain every job
Kerf matches the blade or tool on the floor today. Grain locks visible faces. Changing blades mid-job means revisiting kerf and possibly re-running layouts.
Review yield before you buy
Ask: does this sheet count match what we quoted? Is waste mostly unusable slivers or large offcuts you will shelve? If yield drops after a design tweak, update the client quote before cutting, not after.
Saved projects and stock (paid plans)
Repeat shops benefit from Cutlistor paid plans: save projects, reuse stock definitions, and avoid retyping the same 18 mm birch row on every kitchen. Free optimizers still export cut plan PDFs; paid features reduce transcription time across bids.
Spreadsheet vs optimizer
Spreadsheets are excellent for lists, sorting, and job costing. They do not nest rectangles on plywood or sequence cuts on sticks with kerf. Most shops use both: Excel or Sheets for money and Cutlistor for layout and PDF export.
When a spreadsheet is enough
- Tiny jobs with fewer than ten easy parts
- Jobs where material cost is negligible compared to labor
- Lists needed only for purchasing, not for nesting diagrams
When an optimizer wins
- Multiple sheets of prefinished goods
- Mixed part sizes where manual sketching takes hours
- Linear jobs with several stock lengths and tight waste targets
What goes on the cut plan PDF
The cut plan PDF is the handoff between planning and production. Cutlistor generates it from the same part list and stock you entered. It is specific to one job and one layout revision.
Sheet cut plan PDF
Shows each sheet with nested part rectangles, labels, and dimensions. Your panel saw or table saw crew uses it to rip and crosscut in a sensible order. Grain-locked parts appear in the orientation you configured.
Linear cut plan PDF
Shows each stick with cut positions along the length. Your miter saw, chop saw, or bar station uses it to pull the right number of sticks and cut in sequence. Kerf is already accounted for in the plan.
Getting the PDF to the floor
Print at the station or send to tablets. Name files clearly: job number, material, SHEET or STICK, and revision (e.g. KIT-104-MEL-SHEET-R2.pdf). Attach the PDF to your job folder in email, Slack, or your PM tool so everyone opens the same version.
Cutlistor does not ship blank downloadable templates. The PDF is always generated from your entered parts and layouts.
Labeling on the floor
- Use the same part ID on the PDF, pencil mark, and edge band ticket
- Cut largest parts first when the layout allows, to preserve handling room
- Shelve labeled offcuts above a minimum size you actually reuse
Lumber and trim stations
Keep linear cut plan PDFs at the miter saw. When yards deliver mixed lengths, the optimizer picks sticks, but still verify you have enough of each length before the truck leaves.
Purchasing and estimating from cut plans
Cut planning should close the loop with purchasing. When optimization reports four sheets of 18 mm prefinished maple instead of five, that difference belongs in the quote and the PO. Estimators who only list parts without running layouts often pad sheet count blindly. Planners who optimize first buy closer to reality.
When to add buffer stock
Add explicit buffer only for known risks: learning curves on new CNC programs, brittle veneers, or jobs where the client changes species mid-stream. Do not hide buffer inside fake part quantities. That breaks the cut list when someone audits quantities against the drawing.
Talking to your supplier
Send sheet count and SKU, not a screenshot of nested parts unless they ask. If your yard cuts plywood to rough size, confirm whether their break fee matches your assumed stock dimensions before you nest. A mismatch here can throw off an entire sheet count.
Mixed sheet and linear jobs
Kitchens, closets, and storefronts usually need both optimizers. Run sheet layouts for boxes and backs, linear layouts for face frames, cleats, or metal supports. Keep two cut plan PDFs clearly titled so the panel saw team does not grab the stick diagram by mistake.
On install-heavy weeks, batch cut planning by material rather than by room when grain and color match: cut all 18 mm gables for three kitchens in one sheet run, but only if your labeling system prevents mixing job IDs on the truck.
FAQ
What is a cut plan PDF?
A PDF exported from Cutlistor after you run a layout. It shows nested parts on sheets or cut sequences on sticks, with labels and dimensions. Your crew uses it at the machine. It is not a blank form you fill in by hand.
Who should own cut planning?
One accountable person per job release, whether that is a project manager or lead carpenter. Optimization can be delegated, but only one cut plan PDF revision should be marked cut-ready at a time.
What if the client changes a size?
Update the part list, re-import if needed, re-run sheet and linear optimizers, export a new cut plan PDF with a revision note. Never cut from an old layout after a dimension change.
New to Cutlistor?
Walk through the step-by-step optimizer tutorial, then run a small real job with free tools before relying on it on a deadline install.
Conclusion
A cut planning workflow turns tribal knowledge into checklists: lock dimensions, build honest lists, optimize per material, export cut plan PDFs, label parts. Cutlistor handles nesting and export. Your shop supplies discipline and measurement.