
Article
Sheet vs Linear Cutting: 5 Differences Between 2D and 1D Nesting
Cutlistor Team6 min read
Introduction
Cutting optimization is not one problem. Sheet goods need two-dimensional nesting: rectangles placed on a plywood or plate footprint. Bar stock needs one-dimensional sequencing: lengths cut from sticks with kerf between each piece. Using the wrong model wastes time at best and buys the wrong material at worst.
Cutlistor ships two free browser tools: a sheet cut list optimizer for panels and a linear cut list optimizer for lumber, trim, pipe, and extrusion. This guide explains when each applies, how kerf and grain differ between them, and how mixed jobs should run both without mixing PDFs on the saw.
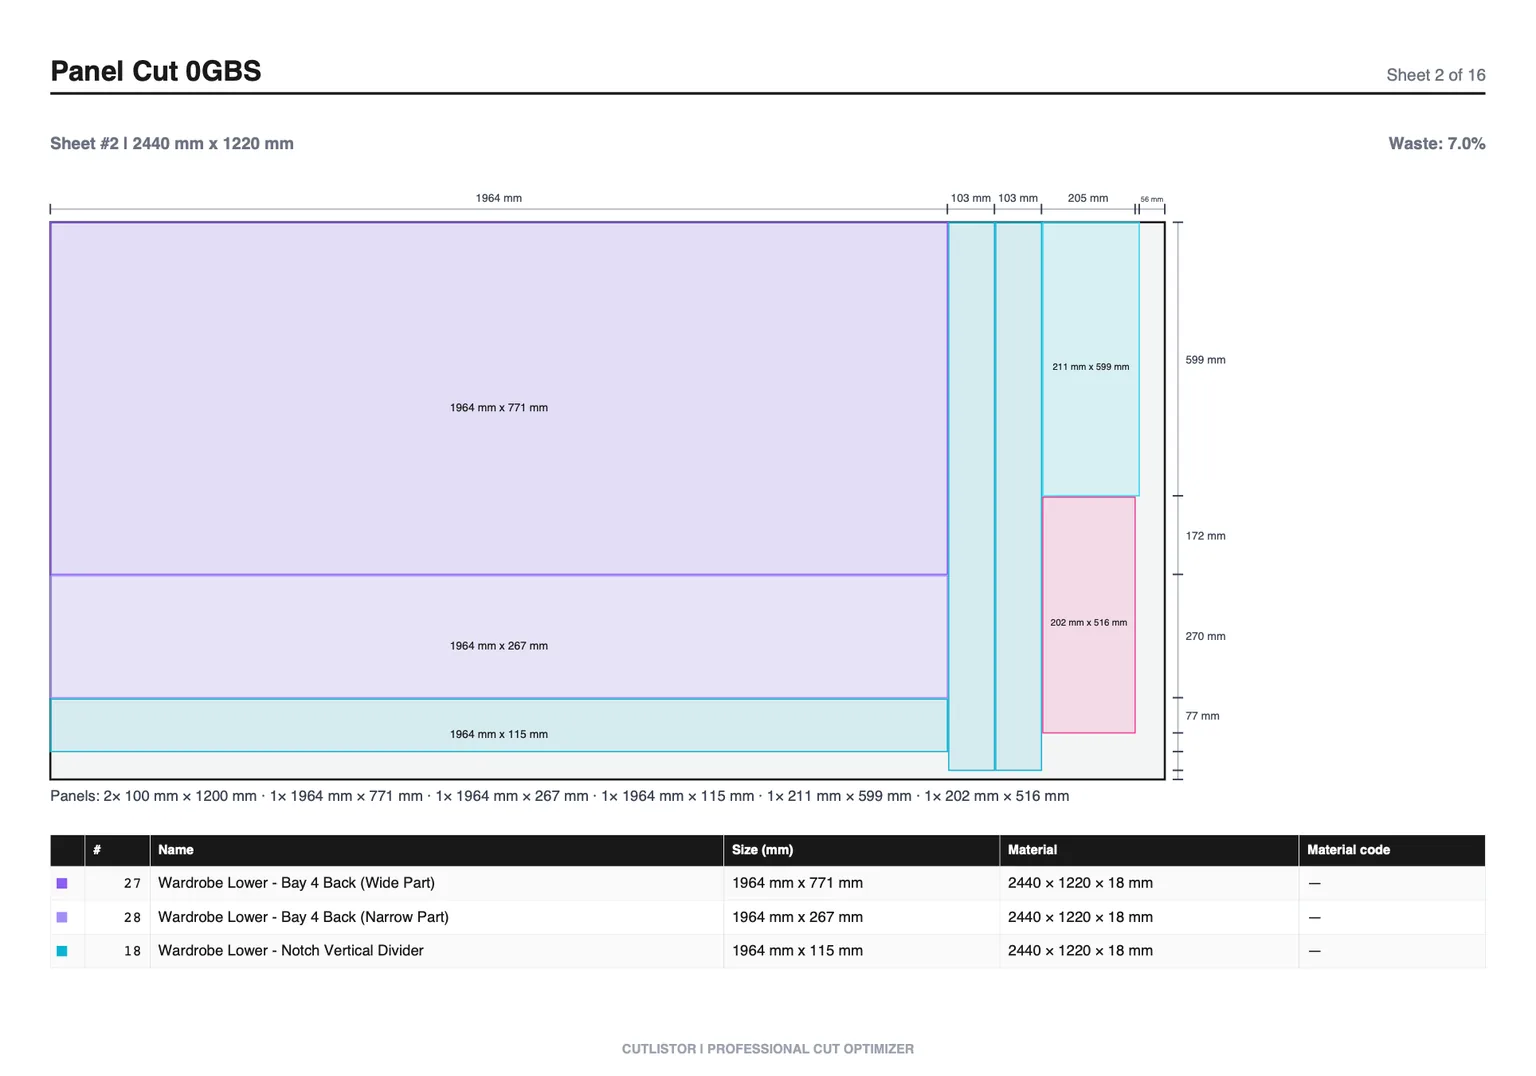
Sheet optimization (2D nesting)
Sheet optimization packs parts with width and height onto rectangular stock. Think cabinet sides on plywood, countertop blanks on MDF, or metal plates on a mill sheet. The algorithm rotates parts (unless grain forbids it), leaves kerf gutters, and reports how many sheets you need.
When to use 2D nesting
- Both finished width and height matter on panel stock
- Material arrives as sheets, not rips you will glue up later
- Yield is measured in square feet or square meters saved
- CNC or panel saw follows a flat diagram
What Cutlistor does for sheets
Enter each sheet size and quantity, add rectangular parts, set kerf, constrain grain when faces are visible, compare multi-method layouts, export PDF diagrams. Import CSV or XLSX when your BOM already lives in a spreadsheet. Paid plans add CAD import (glTF, GLB, Collada) and saved projects for repeat SKUs.
Grain is a 2D constraint
Linear tools ignore grain because sticks do not have a furniture face in the same way. On sheets, grain can override yield: a layout that saves a square foot but runs grain sideways on a door is a remake, not a win.
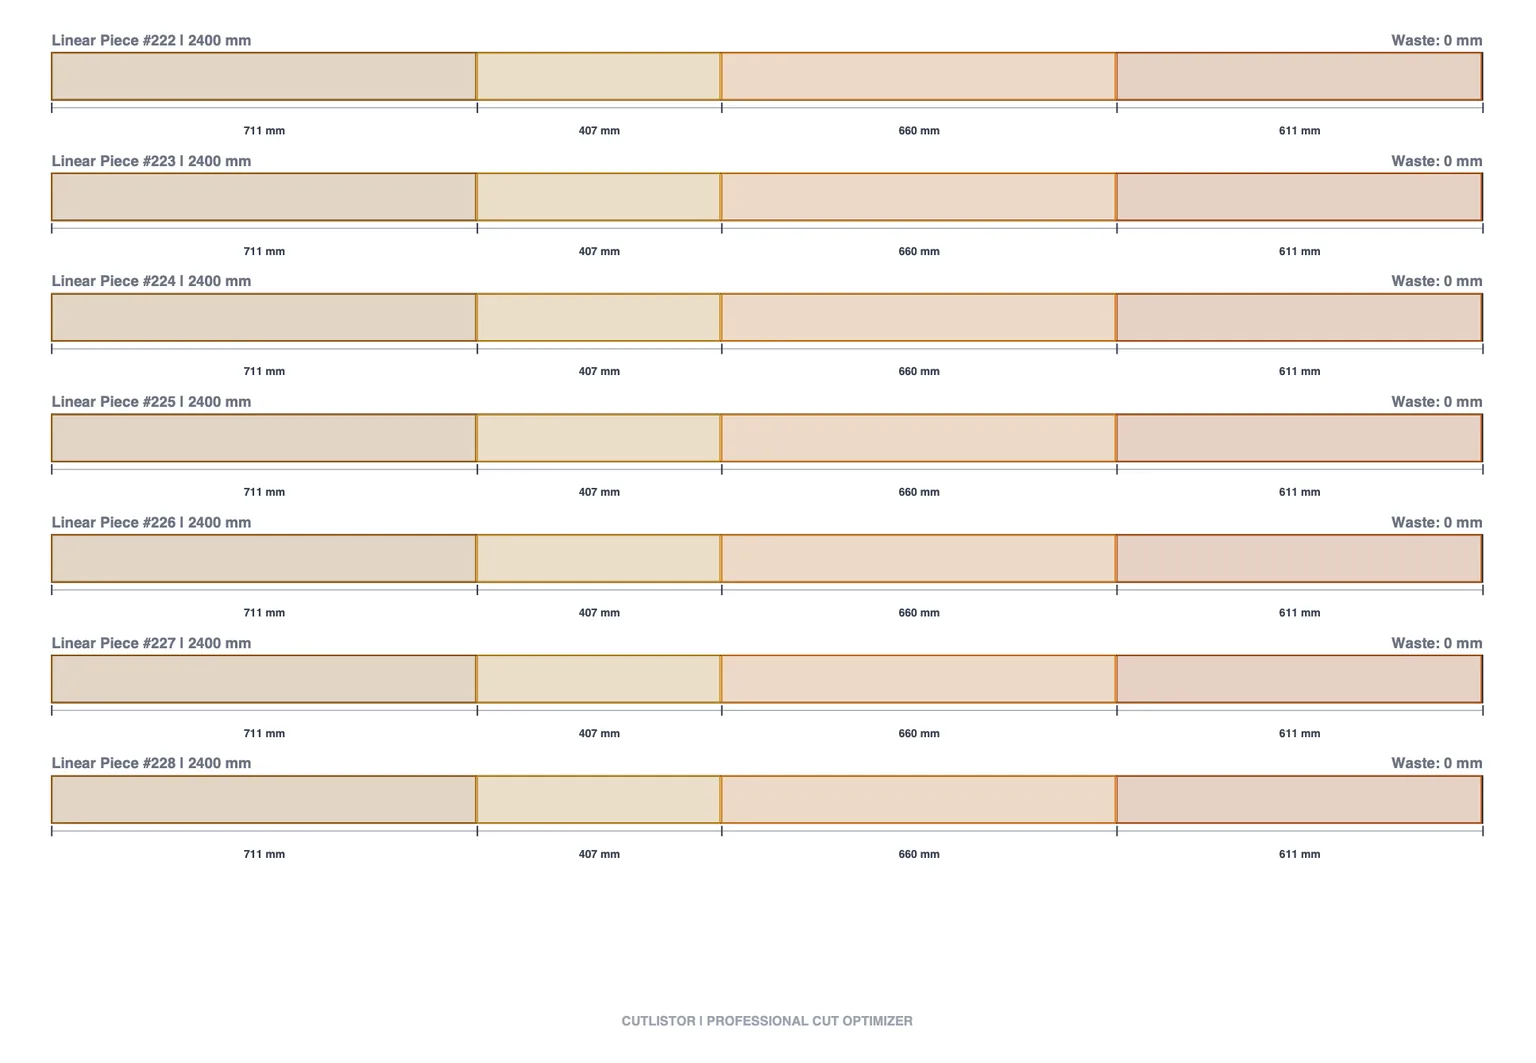
Linear optimization (1D nesting)
1D nesting sequences cuts along a single axis on bar or stick stock. Each cut consumes kerf; the next piece starts after that loss. The optimizer chooses which stock length to open when you offer 8 ft, 10 ft, and 12 ft together.
When to use 1D nesting
- Only finished length drives the part (studs, trim, pipe)
- Stock is purchased by stick or bar, not by sheet area
- Miters or angled ends matter (use linear miter support)
- Waste shows up as tail length on the last stick
What Cutlistor does for linear stock
The free linear cut list optimizer accepts multiple stock lengths per material, kerf between cuts, and mitered ends when trim requires angles. Export PDF stick plans for the miter saw or manual chop station. This is separate from the sheet tool: do not enter panel rectangles here.
Sheet vs linear: side-by-side
| Question | Sheet (2D) | Linear (1D) |
|---|---|---|
| Primary size fields | Width and height | Length |
| Typical stock | Plywood, MDF, plate | Lumber, trim, tube, bar |
| Kerf | Between rips and crosscuts | Between each length cut |
| Grain | Often critical | Usually N/A |
| Rotation | Yes, unless locked | N/A |
| Multi-stock | Several sheet SKUs | Several stick lengths |
| Cutlistor tool | Free sheet optimizer | Free linear optimizer |
| PDF shows | Nested rectangles per sheet | Cuts per stick |
When the wrong tool costs money
Panel parts in the linear tool
If you enter a cabinet side as only length in the linear optimizer, you are not placing it on a sheet. You will not see sheet count or 2D waste. Always model true rectangles in the sheet tool.
Long trim in the sheet tool
A 3.2 m baseboard strip is not a plywood rectangle unless you are cutting it from a sheet intentionally. Purchased 16 ft primed MDF trim belongs in linear optimization with correct stock lengths and miters.
Kerf applied once vs many times
On sheets, kerf applies along both axes depending on cut order. On sticks, every length cut eats kerf. Underestimating either side shrinks parts after the final pass.
Mixed jobs: running both optimizers
Real furniture and cabinet jobs are mixed. A kitchen might need twelve sheets of 18 mm plywood, six sheets of back, and four sticks of crown. Treat each material family as its own optimization run and its own PDF.
Suggested sequence
- Split the BOM by material and thickness
- Run sheet optimization per panel SKU; note sheet count for purchasing
- Run linear optimization per stick SKU; note stick count
- Label PDFs clearly (SHEET vs STICK) before printing
- Re-run both if the design changes, even one dimension
Import once, optimize twice
Build one CSV or XLSX with clear material codes, import into Cutlistor for sheet rows, filter or copy linear rows into the linear tool (or maintain separate tabs in your spreadsheet). Paid project storage keeps both runs under one job name.
CNC and manual shops
CNC shops still need 2D nests for sheet programs. Manual shops benefit from PDFs that respect grain and kerf even without machine postprocessors. Linear PDFs help miter saw operators more than a spreadsheet column of lengths alone.
Real shop examples
Kitchen cabinet run (mostly 2D)
A row of base cabinets might include twenty unique rectangles on 18 mm plywood, six backs on 6 mm, and one sheet of drawer bottoms. Run two sheet optimizations (18 mm and 6 mm) plus a linear pass for toe-kick strips ripped from MDF boards if you buy them as sticks. Crown molding stays in the linear tool with miters enabled.
Deck and framing (mostly 1D)
Deck joists and railing posts are length-dominant: optimize on purchased 2× lumber lengths with kerf at the chop saw. Sheet goods appear only if you sheath with plywood or build stair stringers from panels. Do not model joists as 2D rectangles on a 4×8 unless you are actually cutting them from a sheet.
Signage and plate (2D with machine constraints)
ACM and aluminum plate jobs are pure 2D with kerf equal to router bit diameter. Grain may be irrelevant but sheet size and clamp zones matter. Export PDFs that match how the CNC operator loads sheets, including which edge is reference zero if your post expects it in notes.
Guillotine vs free nesting (sheet)
Some saws require guillotine-style cuts: full-width rips then crosscuts. Cutlistor multi-method layouts let you compare approaches when one method matches your saw better than another. Pick safety and accuracy over theoretical minimum waste if the tightest nest needs risky skinny rips.
Manual panel saw shops often prefer fewer, wider rips even at slightly lower yield because handling full sheets alone is slower than fighting a nest of tiny polygons. Talk with the operator before you lock a layout the office likes but the floor refuses.
FAQ
Is there a single optimizer for both?
Cutlistor provides dedicated free tools because the math and UI differ. Use the sheet optimizer for panels and the linear optimizer for sticks. Combined jobs use both exports, not one blended layout.
Are both optimizers free?
Yes. Sheet and linear nesting with PDF export are free in the browser. Paid plans add project storage, CAD import, and AI plan scan quotas when you need faster part entry.
Where to learn step by step
Read the optimizer tutorial for click-by-click sheet and linear flows, then the material optimization guide for yield habits on the floor.
Conclusion
Sheet optimization is 2D nesting with grain and kerf on rectangles. Linear optimization is 1D sequencing with kerf and optional miters on sticks. Mixed shops run both, label PDFs clearly, and never force panel parts into a length-only tool. Pick the right model and purchasing gets easier immediately.