Article
How to Create a Cut List from Rhino 3D (2026 Guide)
Cutlistor Team12 min read
Introduction
A cut list is the parts bill you take to the saw: every panel or stick with finished size, quantity, and material. Rhino 3D is widely used for furniture, cabinetry, exhibition displays, architectural millwork, and product design, but it does not generate a production-ready cut list or nested cutting layout on its own.
You can stay inside Rhino with EasyCut or FastNesting, export a Collada (.DAE) model into Cutlistor, or skip the model entirely and upload a PDF or screenshot. Designers often start with EasyCut for a quick parts table or FastNesting for sheet layouts. Production shops usually want full sheet and linear optimization, printable cutting diagrams, and material cost estimates, which is where Cutlistor fits after the model is ready.
What Is a Rhino Cut List?
A Rhino cut list is the same workshop document you would build by hand, except the dimensions come from your 3D model. When someone searches for a Rhino cut list or cut lists in Rhino, they want a clean parts table they can cut from, not just a rendered viewport.
A reliable list usually includes:
- Part names (side panel, shelf, door, drawer front)
- Part dimensions (length × width, plus thickness when it matters)
- Quantities for each unique size
- Materials (for example birch plywood 18 mm, MDF, melamine, solid oak)
- Thickness when sheet goods and edge banding affect finished size
- Edge banding notes when finishes affect buyouts or reveal sizes
| Part | Length (mm) | Width (mm) | Qty | Material | Edge band |
|---|---|---|---|---|---|
| Side panel L/R | 720 | 560 | 2 | Birch plywood 18 mm | 2L 2R |
| Bottom | 868 | 560 | 1 | Birch plywood 18 mm | Front |
| Shelf | 868 | 540 | 2 | Birch plywood 18 mm | Front |
| Back | 900 | 720 | 1 | Hardboard 3 mm | N/A |
| Door | 714 | 446 | 2 | MDF 18 mm | All edges |
A parts table is not yet a buying decision. Those dimensions still have to be nested against the sheet sizes and stock lengths your supplier actually carries before you know what to order.
Why You Need a Cut List
- Faster production because every part size is decided before cutting starts
- Accurate material ordering for plywood, MDF, melamine, and lumber
- Better estimating and quoting on custom fabrication jobs
- Fewer mistakes from missing panels, wrong quantities, or mixed materials
- Material optimization when the list feeds a nesting engine
- Workshop-ready documentation for CNC, panel saw, and assembly teams
If your next step is nesting parts on sheets or sticks, start with the how to use a cut list optimizer walkthrough, then open the free sheet tool for plywood and panels.
Method 1: Generate a Cut List with EasyCut
EasyCut is a Rhino plugin built for woodworking and furniture workflows. It is popular with designers who already model every part as a separate object inside Rhino and want a parts report without leaving the model.
What Is EasyCut?
EasyCut reads Rhino geometry, groups parts by material, and generates cut lists from the objects you modeled. It lives inside Rhino, so there is no separate browser app for the listing step.
Working inside Rhino keeps the model and the parts list in one place, which is the real draw. What you give up is the production side: offcut reuse, linear stock, and batching several jobs into one nest are handled more thoroughly by a dedicated optimizer.
How to Use EasyCut
Once installed, the workflow is geometry-driven. Parts that are not organized as individual objects will not list cleanly.
- Model your project with each panel or component as its own object
- Organize geometry on layers or by material
- Assign materials that match real stock (birch plywood 18 mm, MDF, melamine)
- Generate the cut list from the model
- Export results for review or the shop floor
Advantages: model-native, familiar for Rhino-only shops, quick parts tables. Limitations: you remain tied to the Rhino desktop workflow, and full material optimization, AI plan import, and browser-based sheet or linear nesting are stronger outside the plugin. Many shops use EasyCut for a first list, then move the BOM into a dedicated optimizer for yield.
Method 2: Optimize Sheets with FastNesting
FastNesting is a Rhino nesting plugin designed for sheet optimization. It is commonly used in CNC workflows where the priority is fitting parts on plywood, MDF, or acrylic panels rather than building a full parts bill from scratch.
What Is FastNesting?
FastNesting nests flat parts on sheet stock inside Rhino. It excels at layout and yield on panel goods, which makes it useful when you already know your part sizes and need a cutting plan for the CNC table or panel saw.
It differs from a full cut list workflow because the focus is nesting geometry on sheets, not necessarily generating a complete BOM with quantities, edge banding, and linear stock. Many shops pair FastNesting for sheet layouts with a separate tool for lumber, trim, and aluminium extrusion.
Method 3: Import Your Rhino Model into Cutlistor
Instead of manually creating spreadsheets or switching between plugins, Cutlistor can import your Rhino model and automatically generate cut lists plus optimized cutting layouts. Export once as Collada (.DAE), upload, and let the optimizer group parts, nest sheets, and estimate material.
Prepare Your Rhino Model
Each part must be prepared correctly before export. Cutlistor reads objects and materials from the Collada file, so messy geometry becomes a messy cut list.
1. Organize Individual Parts
Each cabinet panel, shelf, door, or component should be modeled as its own object. Do not leave finished panels buried inside a single polysurface block.
- Side panel
- Shelf
- Door
- Drawer front
- Top panel
- Bottom panel
2. Assign Materials
Assign materials or organize parts by the material they will be cut from. Clear material names let Cutlistor group parts automatically when you import.
- Birch plywood 18 mm
- MDF 18 mm
- White melamine
- Solid oak
- Walnut
- Aluminum extrusion
3. Export as Collada (.DAE)
Follow these steps in Rhino:
- Select the objects you want to export
- Go to File → Export Selected
- Choose COLLADA (.dae) as the file format
- Name the file and click Save
- Adjust the polygon mesh settings when prompted
- Export the model
Import the Rhino Model into Cutlistor
After you upload the .DAE file, Cutlistor reads the assembly and builds a production-ready workflow from the objects you prepared.
- Reads every object
- Detects dimensions
- Calculates quantities
- Groups parts by material
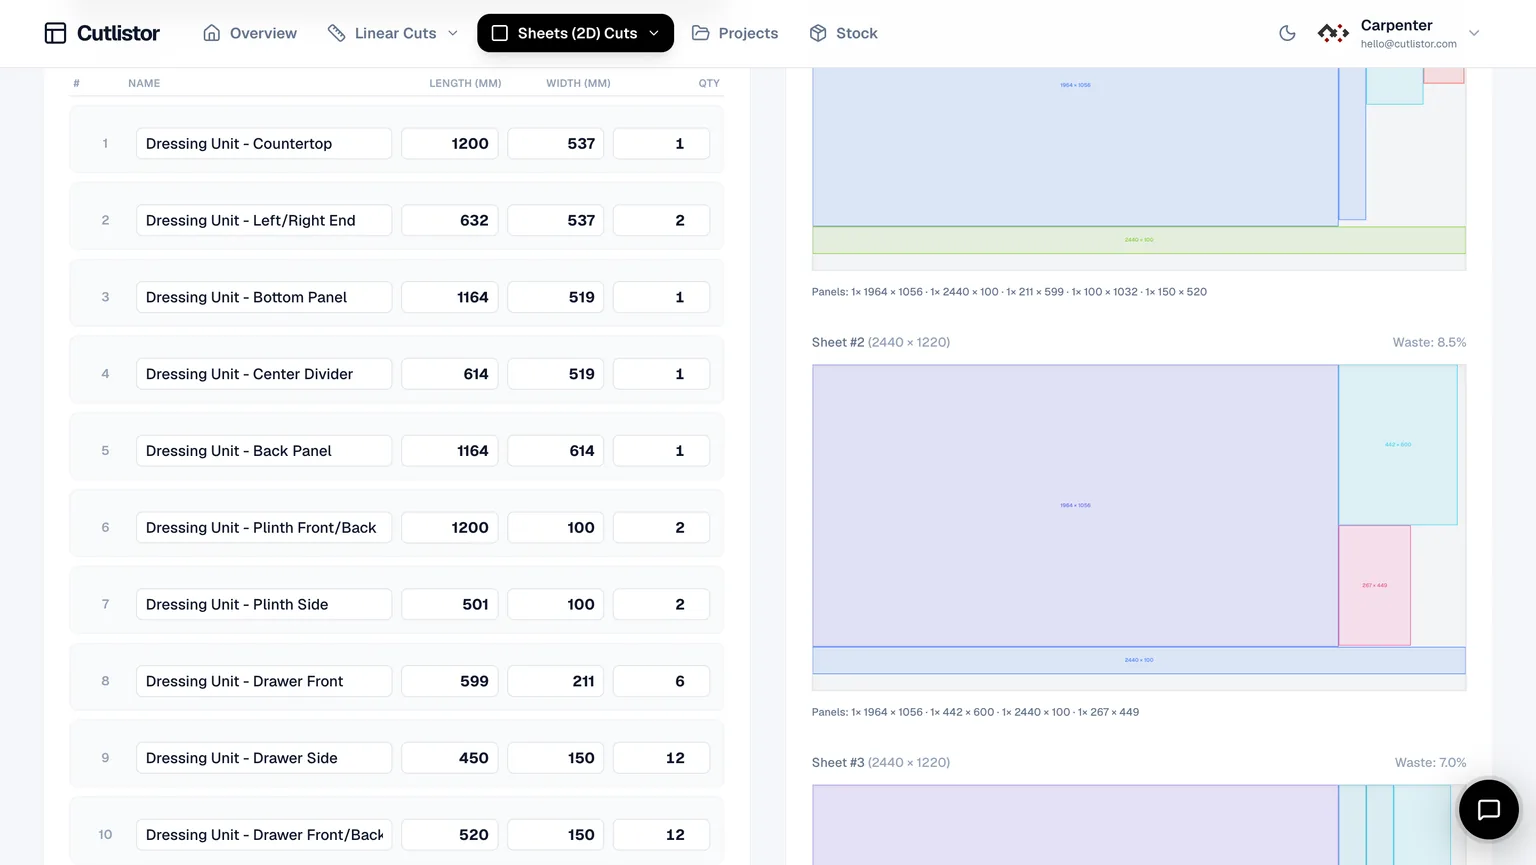
- Generates the cut list
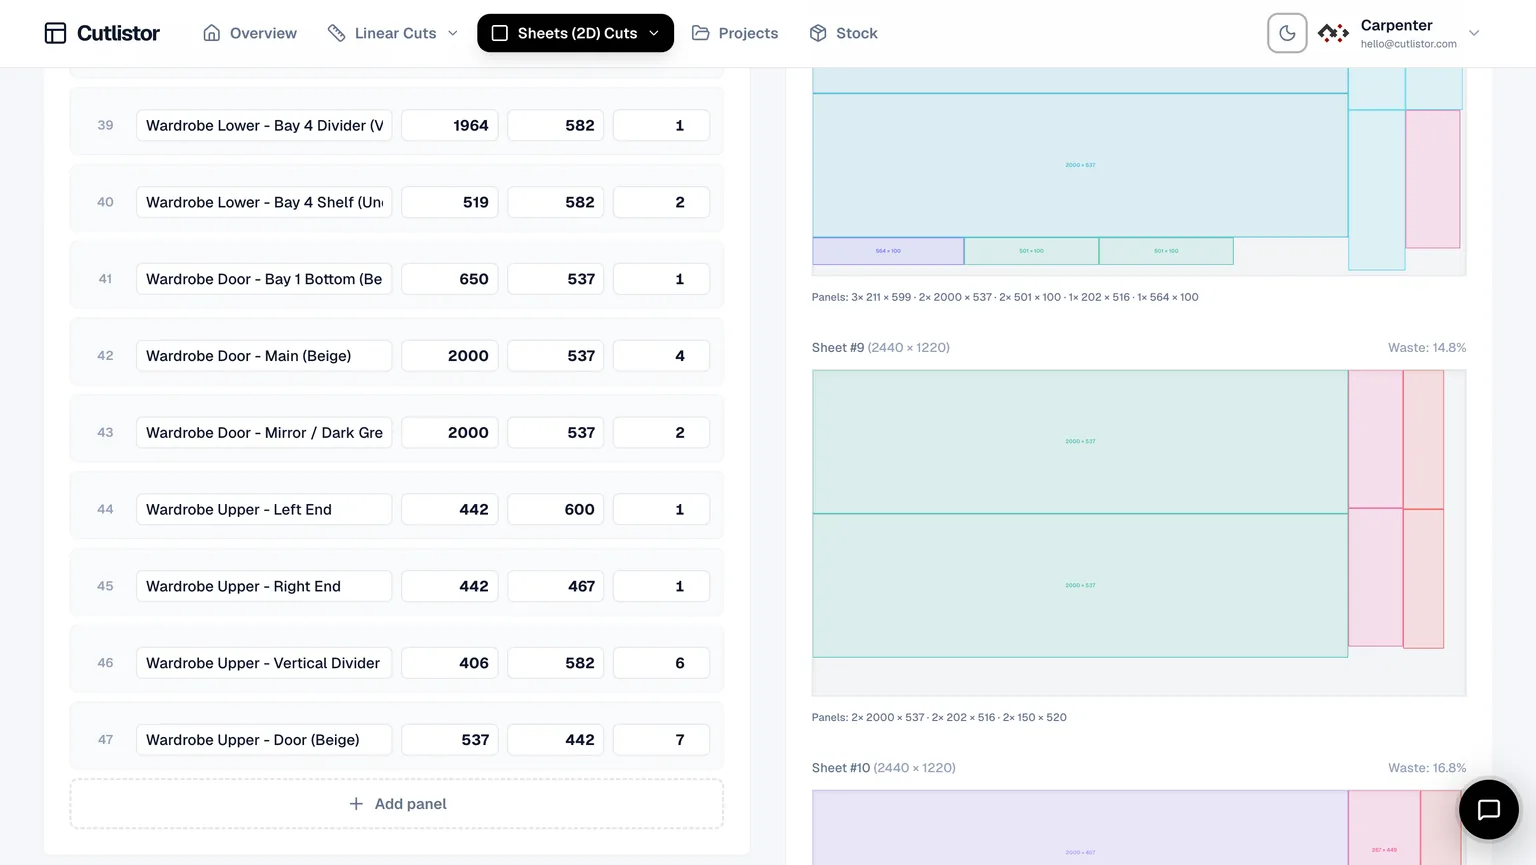
- Optimizes sheet layouts
- Optimizes linear materials
- Estimates material costs
Method 4: Import a PDF Drawing
Not every Rhino project is available as a 3D file. If you already have workshop drawings, Cutlistor AI can extract parts from uploaded plans so you still get a cut list and optimized layouts.
Upload workshop drawings, technical drawings, furniture plans, cabinet plans, or manufacturing PDFs. Review the extracted sizes against critical field measurements, then nest the list the same way you would after a model import.
Method 5: Import an Image or Screenshot
Users can also upload Rhino screenshots, technical sketches, hand-drawn plans, dimensioned drawings, or photos of printed plans. The AI analyzes the drawing and generates a cut list you can edit before optimization.
Use this route when the drawing exists but a clean export does not. Treat the result as a first draft and check anything that controls fit — hinge positions, reveals, and overlays — against the drawing before cutting face material.
EasyCut vs FastNesting vs Cutlistor: Which Is Best?
| Feature | EasyCut | FastNesting | Cutlistor |
|---|---|---|---|
| Where it runs | Inside Rhino | Inside Rhino | Browser (no Rhino needed after export) |
| Cut list from model | Yes, from geometry | Limited (nesting focus) | Yes, via Collada (.DAE) import |
| Sheet optimization | Basic | Strong sheet nesting | Full multi-method nesting |
| Linear / lumber optimization | Limited | No | Dedicated linear optimizer |
| Edge banding | Material notes in the plugin | No | Per-edge banding with stock and diagrams |
| Lamination | Manual notes / materials | No | Front and back laminate on parts |
| PDF / screenshot import | No | No | Yes, with AI extraction |
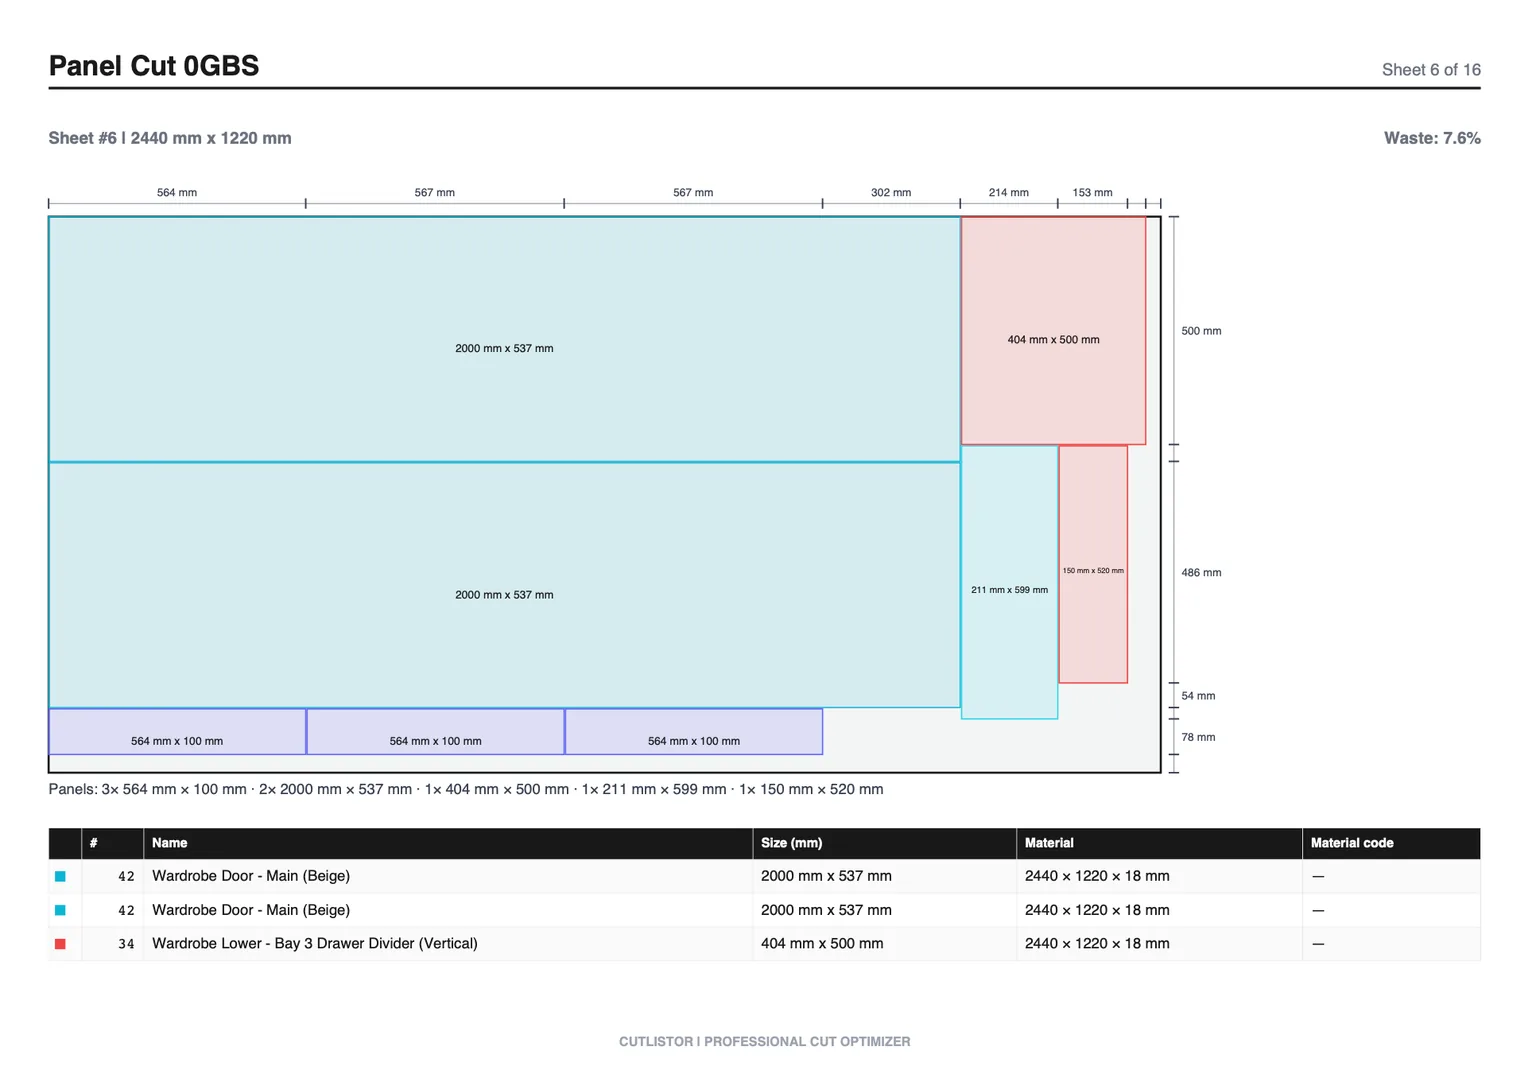
| Workshop PDF layouts | Reports from the plugin | Nesting layouts in Rhino | Printable nested cutting diagrams |
| Offcut reuse and cost estimates | Limited | Limited | Built into optimization workflow |
| Best for | Rhino-only cut lists in the model | CNC sheet nesting in Rhino | Production shops that need yield and PDFs |
| Price | Paid Rhino plugin | Paid Rhino plugin | Free optimizer + paid CAD/AI quotas |
Choose EasyCut if you want to stay inside Rhino and generate a parts list from geometry you already modeled. Choose FastNesting when sheet layout on the CNC table is the main bottleneck. Choose Cutlistor if you need kerf-aware sheet and linear nesting, edge banding and lamination on the cut list, AI plan import when you do not have a model, and workshop-ready cutting diagrams after the list is built.
Many shops use EasyCut or FastNesting for a quick in-model check, then Cutlistor for final optimization and PDF handoff. PDF and screenshot import in Cutlistor also cover jobs where no Rhino file exists at all.
Why Material Optimization Matters
Generating a cut list is only half the process. Plywood prices continue to increase. MDF and melamine costs add up quickly on multi-room jobs. Aluminum extrusions and hardwood are expensive. Poor layouts increase waste, and manual planning often leads to buying more material than necessary.
Optimizing the cutting layout can significantly reduce waste and improve profit margins. A perfect Rhino model still wastes money if panels are laid out by eye.
For practical waste-reduction tactics, read the material optimization guide and compare sheet nesting with stick cutting in our sheet vs linear guide.
From Rhino Model to Production
- Rhino 3D model
- Export COLLADA (.DAE)
- Import into Cutlistor
- Automatic cut list
- Material grouping
- Sheet and linear optimization
- Workshop cutting diagrams
- Manufacturing
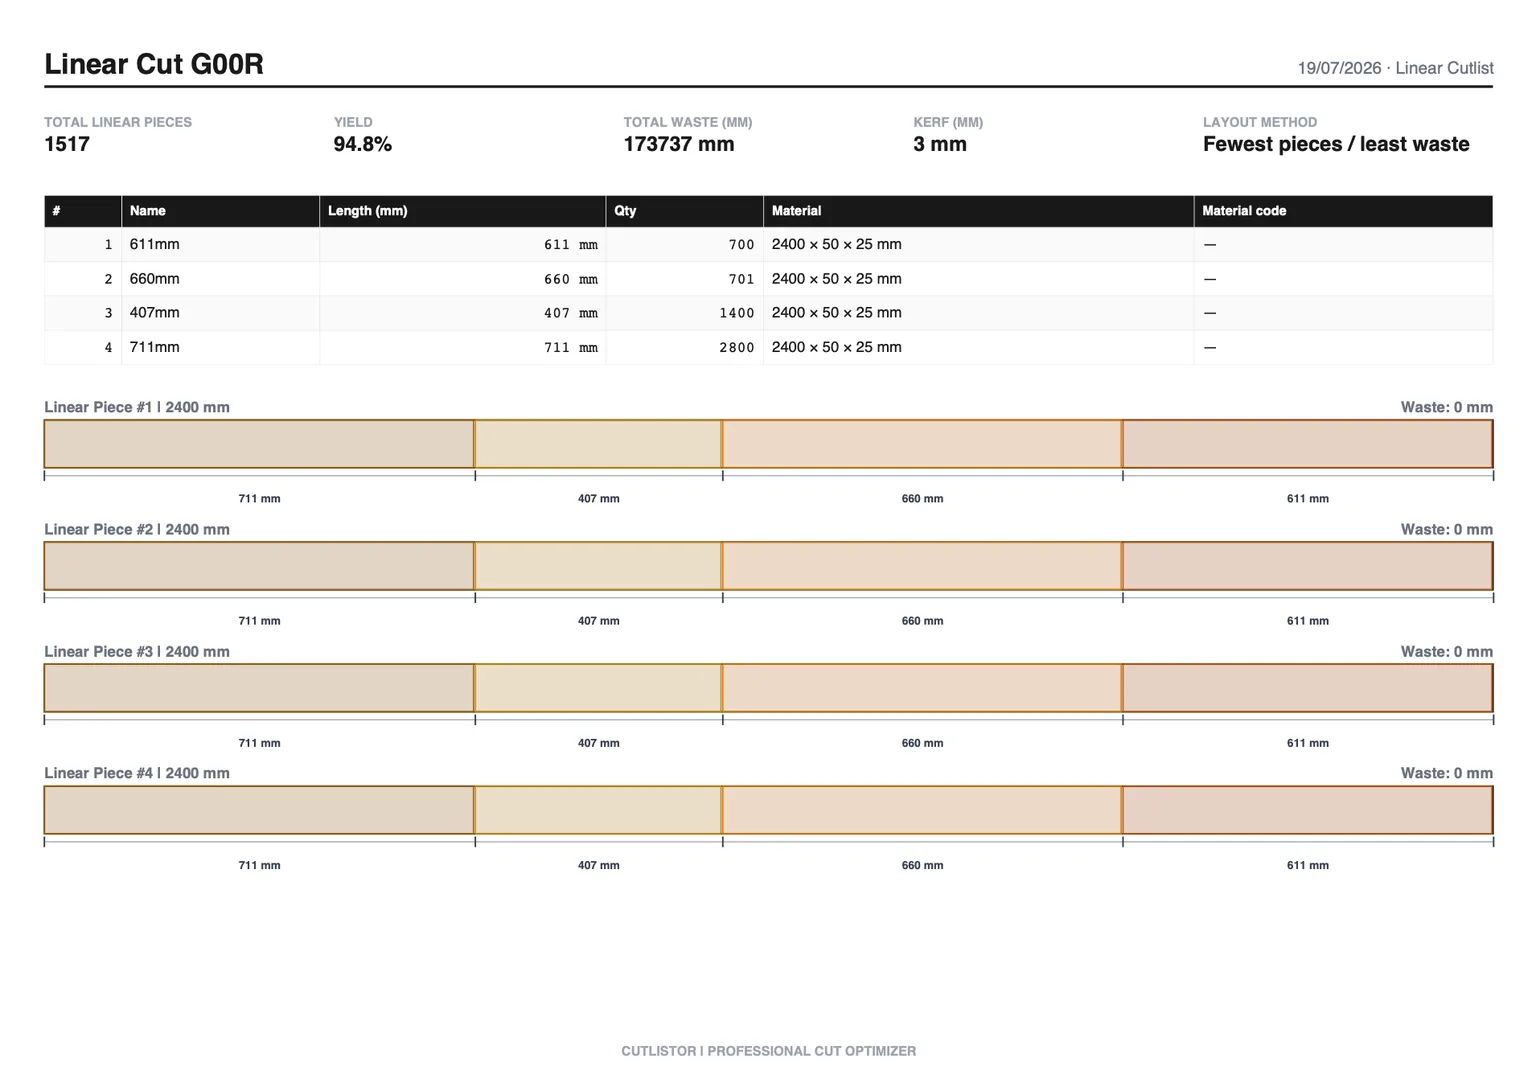
Rhino models frequently mix panels and profiles in one file. Split them before optimizing: panel geometry goes to the sheet nester, while extrusions, rails, and tube stock go to the linear optimizer, which solves a different problem entirely.
Features That Save Time
- Import Rhino 3D models (.DAE)
- Import PDFs and images with AI
- Generate cut lists automatically
- Optimize plywood, MDF, melamine, and acrylic sheet goods
- Optimize lumber, aluminum extrusions, steel profiles, and other linear materials
- Reuse offcuts
- Calculate required materials
- Estimate material costs
- Generate printable cutting layouts
Common Mistakes When Exporting from Rhino
Import problems almost always trace back to how the model was built rather than to the exporter. A short pass over the file before export saves far more time than cleaning up the parts list afterwards.
Exporting the entire scene
Lights, construction geometry, and reference blocks pollute the cut list. Use Export Selected and include only production parts.
Duplicate geometry
Hidden copies of the same panel inflate quantities. Purge unused objects and check for stacked duplicates before export.
Incorrect object scaling
Exporting a model in the wrong units produces parts that are inches-as-millimeters or the reverse. Confirm model units before Collada export.
Unorganized parts
Multiple panels welded into one polysurface hide part boundaries. Keep each cut panel as its own object so quantities and sizes resolve correctly.
Missing material assignments
Objects left on the default material arrive as one undifferentiated group, and separating 3/4 in ply from 1/2 in backs by hand defeats the point of importing. Name the material on every production object first.
Exporting unsupported file formats
Cutlistor imports meshes such as Collada (.DAE), glTF, and GLB. Exporting only a 2D drawing or an unsupported format means you lose 3D part detection. Use .DAE for Rhino, or upload a PDF or screenshot instead.
Frequently Asked Questions
How do I create a cut list in Rhino?
Organize each part as its own object, assign materials, then either run EasyCut inside Rhino or export Collada (.DAE) and import into Cutlistor for a cut list plus optimized layouts.
Does Rhino have a cut list feature?
No. Rhino does not ship a native woodworking cut list or nesting tool. You need a plugin such as EasyCut or FastNesting, or an external optimizer such as Cutlistor.
What is EasyCut for Rhino?
EasyCut is a Rhino plugin for woodworking. It generates cut lists from geometry and materials in your model.
What is FastNesting?
FastNesting is a Rhino nesting plugin for sheet optimization. It is commonly used in CNC workflows to nest flat parts on panel stock.
Can Rhino export a cut list?
Not by itself. With EasyCut you can export reports from the model. With Cutlistor you export a 3D Collada file, then generate and export the cut list and cutting PDFs from the optimizer.
Can I import Rhino models into Cutlistor?
Yes. Export your Rhino model as Collada (.DAE) and import it into Cutlistor. The tool detects objects, dimensions, quantities, and materials, then builds the cut list and nests parts.
Can I upload a PDF instead of a Rhino file?
Yes — if the drawing exists only as a PDF, it can be scanned into a parts list directly, which is often quicker than rebuilding the geometry in Rhino just to export it. Check the extracted sizes before optimizing.
Can AI generate a cut list from a Rhino drawing?
Yes. A viewport screenshot with visible dimensions is usually enough to produce a starting list. It is a draft, not a substitute for the model — confirm every dimension that affects fit before anything is cut.
What file formats does Cutlistor support?
For 3D CAD, Cutlistor supports meshes such as glTF, GLB, and Collada (.DAE), which is the usual Rhino export path. You can also import spreadsheets (CSV/XLSX) and use AI plan scanning from PDFs or images on supported plans.
How do I optimize sheet layouts from Rhino?
Export the model as .DAE, import into Cutlistor, confirm material groups and real sheet sizes, set kerf and grain where needed, then run the sheet optimizer and export PDF cutting diagrams. FastNesting inside Rhino is another option when you only need sheet nesting.
Turn Your Rhino Models into Optimized Cut Lists
Whether you are designing furniture, cabinets, exhibition displays, architectural millwork, or custom fabrication projects in Rhino 3D, Cutlistor helps you move from design to manufacturing faster. Export your Rhino model as a Collada (.DAE) file, or upload a PDF or screenshot, and Cutlistor will automatically generate cut lists, optimize sheet and linear materials, estimate material usage, and create workshop-ready cutting diagrams.
With Cutlistor you can:
- Import Rhino 3D models (.DAE)
- Generate cut lists automatically
- Import PDFs and screenshots using AI
- Optimize plywood, MDF, melamine, acrylic, and other sheet materials
- Optimize lumber, aluminum extrusions, steel profiles, and other linear materials
- Reuse offcuts to reduce waste
- Calculate material requirements and costs
- Print professional cutting layouts for the workshop