
Article
How to Read a Woodworking Cut List (Shop Floor Guide)
Cutlistor Team4 min read
Introduction
A cut list only helps if the person at the saw can read it the same way the person who wrote it intended. Misread a quantity, ignore a grain flag, or cut finished size when the list meant rough, and you scrap stock before the first assembly dry-fit.
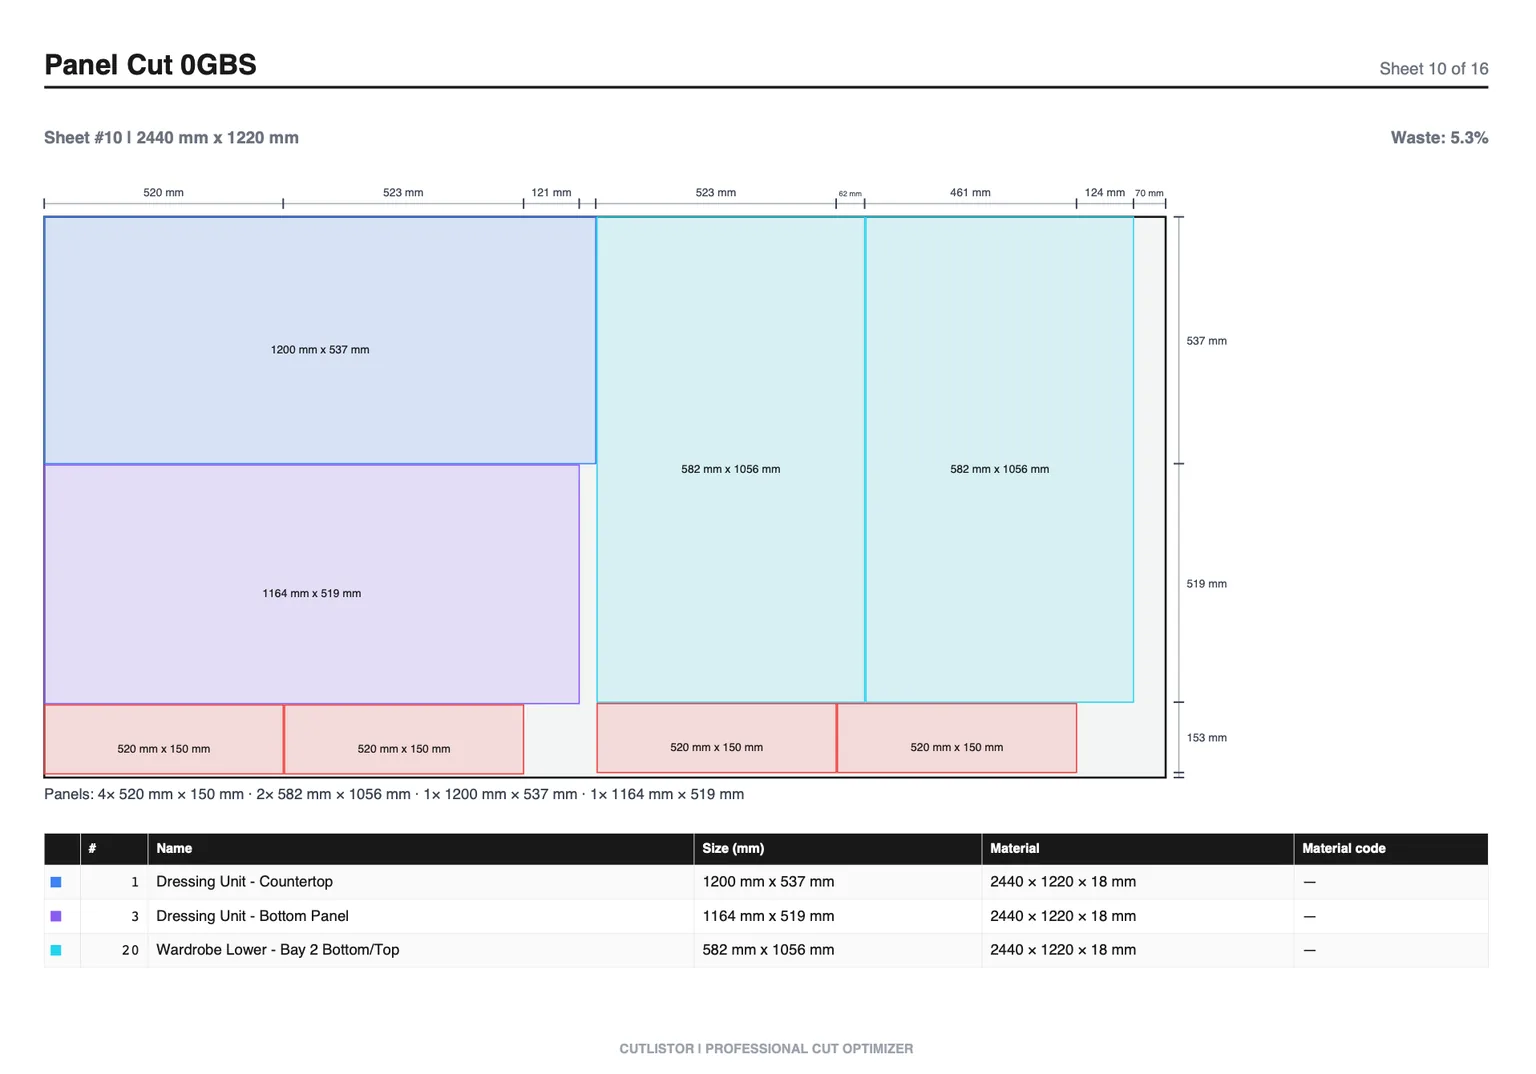
This guide is for the shop floor: how to interpret labels, finished vs rough dimensions, material groups, and how those rows map onto cutting diagrams and PDF cut plans. If you need the definition of the document itself, see what a woodworking cut list is first.
Scan the Header Before You Cut
Start with job number, revision date, units (mm or inches), and kerf. If yesterday's PDF is still on the bench and today's list says Rev B, stop. Cutting from a stale diagram is one of the most expensive habits in a cabinet shop.
Confirm stock sizes listed at the top: 2440 x 1220 mm birch, 8 ft S4S maple, 5x5 Baltic birch. Actual sheet size at the yard can differ from catalog size; measure a sheet if the nest looks impossibly tight.
- Job / revision / date match the drawings you have
- Units are consistent across every row
- Kerf matches the saw or CNC bit you will use
- Stock size matches what is on the rack today
Part Labels and Quantities
| List shows | Floor reads as | Common mistake |
|---|---|---|
| UPR-L, qty 6 | Six left uprights, same size | Cutting only one per cabinet |
| Shelf-A, qty 12 | Twelve identical shelves | Treating A/B sizes as interchangeable |
| FF-Rail, qty 24 | Twenty-four rails from lumber | Nesting them as sheet parts |
| Door-L / Door-R | Paired left/right, may mirror | Flipping grain on one side |
Finished Size vs Rough Size
Finished size is what the assembly needs after joinery and flush trim. Rough size is what you cut oversized so you can joint, plane, or trim to fit. Many lists only show finished size and expect the sawyer to know shop standards (+1/16 in or +2 mm on critical edges).
If the list is silent, ask. Cutting finished size when the shop always flush-trims doors leaves you undersize. Cutting rough when the CNC expects finished leaves you fat and short on sheet yield.
- Solid lumber: often rough length, then square and cut to finished
- Sheet panels: usually finished size if edge-banded after cut
- Doors/drawers: often oversized for trim after glue-up
- Scribe parts: leave extra on the wall edge only
Grain Flags and Face Notes
Grain along length vs grain along width changes how a part sits in the nest. A flag like Grain: long edge or Arrow to top means the show grain must run a specific way. Face notes (good face up, bookmatched pair) tell you which veneer side faces the room.
On prefinished or veneered stock, reverse the face and you own a reject. Match the diagram's orientation marks to the list before the first rip.
Material Groups: Cut One Family at a Time
Rows are usually sorted by material: 18 mm white melamine, 18 mm birch, 3/4 in maple S4S. Never mix groups on one nest. Thickness differences, finish, and grain rules make mixed nests unsafe even when rectangles would fit.
Linear groups work the same way: keep 1x4 pine separate from 1x6 oak. Stock length and cross-section define the 1D problem; species defines which rack you pull from.
Matching the List to the Cutting Diagram
Read the list and the nest together. For each sheet or stick on the PDF: confirm part labels, check that quantities on that diagram plus remaining diagrams equal the list total, and verify kerf gaps look realistic for your blade.
If the optimizer shows a part rotated and your grain flag forbids rotation, stop and re-nest with grain locked. Cutlistor sheet nests respect grain direction when you set it; linear nests place lengths on stock sticks with kerf between cuts.
Quick walkthrough
- Open the parts list page of the PDF — every label and size
- Open sheet 1 diagram — find UPR-L, confirm 720 x 560 matches the list
- Tally how many UPR-L appear across all sheets; must equal qty
- Check remnant sizes if you planned to save offcuts for another job
- Initial the revision on the print so the next shift knows it is current
Red Flags Before You Make the First Cut
A few minutes of reading saves a sheet of prefinished material.
- Two revisions on the bench with different shelf heights
- Grain required but parts rotated freely on the nest
- List units in inches, diagram annotated in mm
- Quantity on list does not match part count on diagrams
- Kerf blank or set to 0 on a table-saw job
- Material group includes mixed thicknesses