Article
How to Make a Cut List in 2026: 3 Methods Compared
Cutlistor Team7 min read
Introduction
A cut list is the bridge between design and the saw. It names every part, its finished size, how many you need, and which stock it comes from. Without that list, shops guess at quantities, reorder plywood at the last minute, or cut one cabinet side twice while another size is missing entirely.
You can build a cut list by hand on paper, in a spreadsheet, or inside a cut list optimizer that also nests parts on sheet or bar stock. This guide walks through all three paths, with workshop habits that keep dimensions trustworthy before you ever touch a blade.
Start from approved dimensions
Never optimize a cut list while the design is still moving. Freeze part sizes after the client signs off, after field measure, or after your CAD model matches what you will actually build. A cut list built on draft dimensions becomes scrap the moment one reveal or toe-kick height changes.
Pull dimensions from one source of truth: shop drawings, a 3D model, or a printed plan set. If you use Cutlistor on a paid plan, you can import glTF, GLB, or Collada assemblies and derive parts from CAD instead of retyping every rectangle. For paper plans, AI plan scan (paid quotas) can bootstrap a part list, but you should still verify critical sizes against your tape measure before cutting.
Field measure checklist
- Record openings, reveals, and scribe allowances before panel sizes
- Note which faces are visible (grain and edge banding matter)
- Confirm actual sheet or bar lengths from the yard, not catalog defaults
- Flag parts that must stay paired (left/right gables, mirrored doors)
Revision control on the floor
Version your cut list with the job number and date. When a dimension changes, update the list and re-run the optimizer. Reusing an old PDF layout after a scope change is one of the fastest ways to waste a full sheet of prefinished material.
What every cut list should include
| Column | Sheet jobs | Linear jobs |
|---|---|---|
| Part label | Required (e.g. UPR-L) | Required (e.g. Stud-01) |
| Finished size | Width × height | Length only |
| Quantity | Count per label | Count per label |
| Material / SKU | Plywood, MDF, melamine | Species, profile, pipe size |
| Thickness | Usually fixed per sheet group | Actual dimension if it affects kerf stack |
| Grain or face | When appearance matters | Usually N/A unless decorative face |
| Notes | Edge band, dado, drill reference | Miter, cope, assembly bay |
For import into Cutlistor, align columns with the cut list template guide so CSV or XLSX rows map cleanly to parts and stock.
Three ways to build the list
Pick the method based on job size and how much layout work you are willing to do by eye.
Manual on paper
Handwritten lists work for single furniture pieces or repair work with fewer than a dozen parts. Write each part once, circle quantities, and group by material. The weakness is nesting: you still decide how rectangles fit on plywood without yield numbers.
- Fast for one-off tables or trim bundles
- No kerf math unless you add it yourself
- Hard to share across a crew without rewriting
Spreadsheet (Excel or Sheets)
Spreadsheets excel at sorting, filtering, and job costing. They are weak at 2D nesting: you can list every cabinet side, but you cannot see whether those sides fit on three sheets or four without sketching. Many shops keep Excel for pricing and import the same rows into an optimizer for layout.
Optimizer-first workflow
Once you have more than a handful of sheet parts, a cut list optimizer pays for itself in yield and time. Cutlistor runs in the browser: enter stock, parts, kerf, and optional grain, compare multi-method sheet layouts, then export a PDF cut plan for the floor. Linear jobs use the separate free linear optimizer, including mitered ends when trim requires angled cuts.
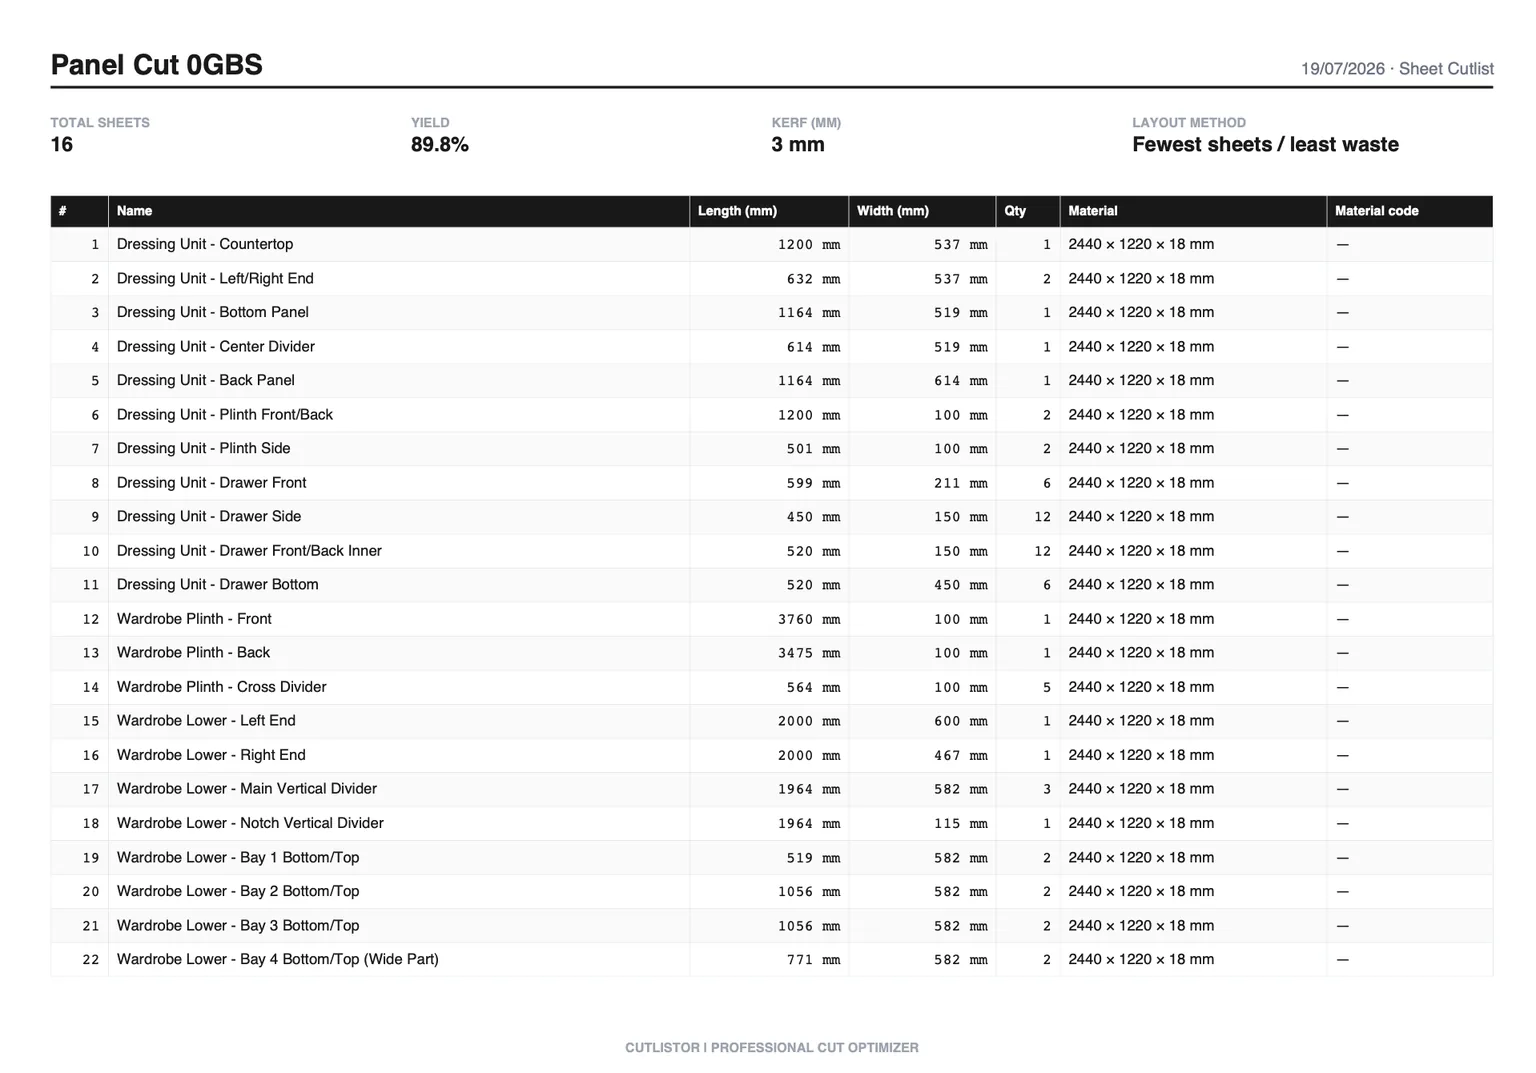
How to make a cut list for plywood and panels
Sheet cut lists describe rectangles cut from plywood, MDF, melamine, or solid surface. The workflow is: group by thickness and SKU, enter the sheet size you actually buy, then let nesting minimize waste.
Group by material and thickness
Never mix 18 mm carcass plywood with 6 mm back panels in one optimization pass. Different thicknesses mean different stock rows and often different saw setups. Run one layout per material group.
Match real stock sizes
North American shops often buy 4×8 ft; metric shops use 2440×1220 mm. Some suppliers stock 5×5 or oversized sheets for wide backs. Enter the dimensions on the label, not a generic default, or yield will lie to you.
Grain direction and kerf
When a face must run vertically on a door or gable, set grain constraints before optimizing. Kerf is the blade thickness removed per cut: table saws often land near 3 mm, thin-kerf blades less. Cutlistor subtracts kerf so finished parts stay on size. Skipping kerf is how a run of cabinet sides ends up 3 mm short after the last rip.
Cabinet job example
A base run of twelve boxes might include gables, shelves, stretchers, nailers, and toe-kick strips. List each unique size once with quantity, assign material (e.g. 18 mm birch ply, 6 mm back), then optimize. Review multi-method layouts if one algorithm leaves an awkward sliver: pick the plan your operator can cut safely on the saw or CNC.
How to make a cut list for lumber and trim
Linear cut lists track length along one axis: studs, hardwood, baseboard, pipe, or aluminum extrusion. Width and thickness are handled as separate stock definitions, not as 2D nesting.
Enter every stock length you will use
Yards ship mixed lengths (8 ft, 10 ft, 12 ft). Add each length as its own stock line with quantity available. The linear optimizer chooses which stick to pull so you waste less tail at the end of the bundle.
Miters and assembly notes
When trim returns to the shop with mitered ends, use the linear optimizer miter support instead of shortening parts by guesswork. Put cope details, finish face, or room numbers in the notes column so cut parts stay sorted at the miter saw.
Import, optimize, and hand off
Typical flow for a medium job: build rows in Excel or export from CAD, import CSV or XLSX into Cutlistor, set kerf and grain, run sheet and linear optimizers separately per material, then export PDF cut plans. Paid plans add saved projects and stock libraries so repeat SKUs do not get retyped every bid.
- PDF export is for shop floor layouts, not blank templates (Cutlistor does not ship downloadable empty PDF forms)
- Re-run optimization when the BOM changes, even if only one part size moves
- Label offcuts you intend to keep: optimizers show waste, humans decide what is worth shelving
Common mistakes when making cut lists
Rough size instead of finished size
Cut lists must list finished part dimensions after edge band, laminate, or scribe. If you cut to rough sizes and trim later, say so in notes or you will double-count allowances.
Double-counting mirrored parts
Left and right gables are not interchangeable if hinge boring differs. Give them distinct labels instead of one line with quantity two unless they are truly identical.
Cutting from a stale layout
The list and the layout must move together. If you change one shelf height after optimization, run the layout again before printing a new PDF.
FAQ
Do I still need a list if I use an optimizer?
Yes. The optimizer is where the list becomes a cutting plan. Parts, quantities, and materials still come from your BOM or spreadsheet. The software arranges them on stock and reports yield.
Can I make a cut list for free?
Cutlistor free sheet and linear optimizers handle everyday nesting and PDF export without installing desktop software. Paid features add project storage, CAD import, and AI plan scanning when you need them.
Bottom line
Making a cut list is disciplined data entry first and layout second. Freeze dimensions, include the right columns, group materials honestly, then let the optimizer fight waste. Your shop spends less on stock and less time explaining why a part is missing on install day.